
Adobe Photoshop is the definite "go to" software for photo and image editing professionals, but you don't need to be a pro to make use of all its amazing options. The more you use this software, the more familiar you will become with its features.
What Can You Do With Photoshop?
Adobe Photoshop is a set of powerful image editing tools that can make you a master at manipulating photos. You can do all kinds of image fixes like editing blurry shots, fixing red-eye in humans and pets, adjusting lighting and making changes to file types, sizes and shapes. If you have an artistic nature, there's a variety of filters and effects you can add to images to make stunning projects.
How to Use Photoshop
Photoshop is an immense program that can take some time to learn. Here you'll find some basics to get you started with resources at the end of the article to further your learning.
When you first log into Photoshop, one of the most important features to know is the Toolbar. You can drag the Toolbar around your screen with your mouse to place it wherever you like or anchor it to the side of the screen to keep it out of the way.
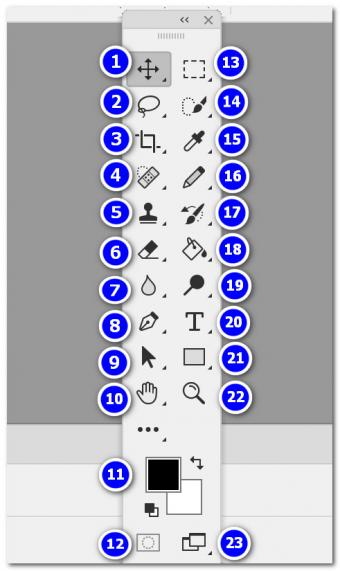
Here's a short rundown of each of the tools on the Toolbar:
- Move - Allows you to move an item around on the art board
- Lasso - Lets you select an area of a photo using your mouse
- Crop - Use to reduce unwanted portions of a photo along a horizontal or vertical axis
- Spot Heal - Replaces an area you highlight using the appearance of what's around it
- Clone - Allows you to copy a specific area of the image and duplicate it elsewhere on the image to cover an area
- Eraser - Use this tool to "erase" a highlighted area on a layer
- Blur - Use to "blur" the edges of an area where you move the mouse
- Pen - This tool allows you to draw vector paths on a layer in the image
- Path Selection - Lets you move around the "points" that you drew with the pen tool above
- Hand - Use this as a "hand" to drag the canvas around the screen
- Foreground and Background Color - The top box is the foreground color and the bottom box is the background color. The arrows to the upper right allow you to switch back and forth between them
- Quick Mask - Allows you to create a "mask" using the drawing tools. A "mask" is much like a stencil that you use to color in certain parts of an image while keeping other parts "clean."
- Marquee - These different shapes allow you to click and drag over an image and select a portion of it
- Quick Selection/Magic Wand - Each of these tools allows you to select portions of the image based on content, such as color
- Eyedropper - Selects a color in the image so you can accurately copy it in another area of the image
- Pencil - A drawing tool you can use to draw "freehand" with the mouse
- History Brush - A sample use of this tool would be converting a color photo to grayscale (black and white) and then using the History Brush to "color" back in areas of the image with the original color
- Paint Bucket - This tool fills in a selected area with a color of your choice
- Dodge and Burn - These tools lighten or darken selected areas of an image based on the concept of light exposure
- Text - Use this to add text to an image
- Shape - Use this to create basic geometric shapes in an image
- Zoom - Allows you to zoom in and out of the art board to view your image
- Screen Mode - Changes the look of your workspace (i.e. full-screen, default)
Note that with several of the tools, if you hold the mouse down on them, a drop-down menu will appear with additional variations of that tool underneath.
Changing Color Modes
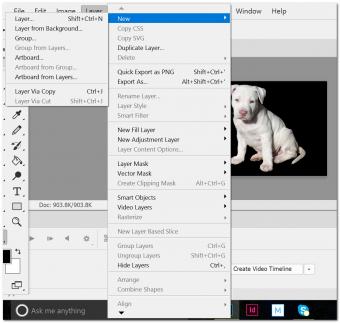
A common use of Photoshop is converting file color formats for print (CMYK) or web (RGB) formats. You can also convert a color image to grayscale. To do this:
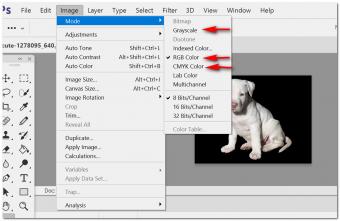
- Open the file by going to the File option on the top navigation menu and selecting Open and finding the file on your computer.
- Then go to Image in the top Navigation menu and select Mode from the drop-down.
- From the Mode option you will see a drop-down menu on the right.
- To convert a file to Grayscale, click on the "Grayscale" option.
- To convert a file to RGB for website use, click on the "RGB Color" option.
- To convert a file to CMYK for printing use, click on the "CMYK Color" option.
Adjusting Images
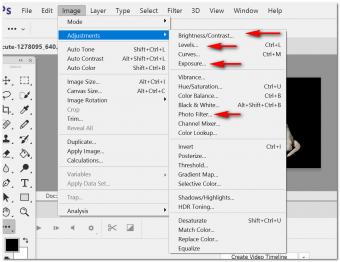
You can use Photoshop to adjust the brightness and contrast, light levels, exposure, and much more to fix images. To do this, choose Adjustments in the Image menu. A drop-down menu on the right will appear. Some of the most common adjustments you may use are:
- Brightness/Contrast - This setting changes the overall brightness or darkness of the image. For example, if you took a picture in a room that was too dark, you can use this option to increase the light in the picture so that the subject matter is viewable.
- Levels - This setting lets you make changes to the tonal range and color balance, specifically by manipulating highlights, mid-tones and shadows.
- Exposure - This setting also works with the lighting in an image and fixes images that may have been overexposed (too much light) or underexposed (too little light).
- Photo Filter - A photo filter is another method of adjusting the color in an image using some preset options. For example, a Warming Filter will make the colors in a photo that has a blue tinge to it appear warmer, whereas a Cooling Filter would do the opposite and make an image appear cooler.
Exporting/Changing File Types
If you work with image files often, particularly for the web, you will find you need to save files as different types, sizes and resolutions fairly often. You can do this easily with Photoshop.
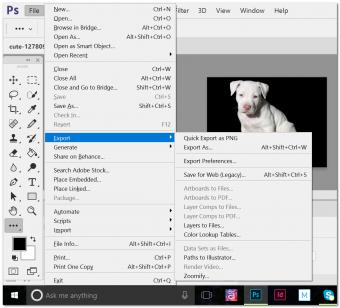
- Under the File option in the top menu, scroll down to Export which will open up a drop-down menu on the right.
- You can click on the "Quick Export as PNG" option if all you need to do is make a PNG conversion.
- If you are looking to do other types of conversions, choose Export As.
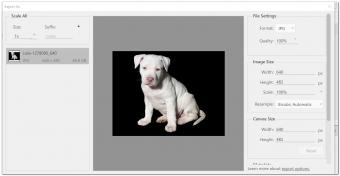
- A new screen will pop up. You can choose the type of file you want to convert to at the top under File Setting. Your options are:
- SVG - Scalable Vector Graphics are used primarily on websites as they are defined by XML files and are designed for interactive and animated styling.
- GIF - A GIF image can have a transparent background and can be low resolution files, but they are limited to 256 colors, which means they're not the best option for high quality photographs.
- PNG - A PNG file is a favorite format for website designers who need to have crisp, high quality images that also are smaller in size. PNGs also can be transparent like GIF files (only PNG-24 and PNG-32 though).
- JPG - Also known as JPEG, these image files can have up to 16.7 million colors and are a good option for photo files with multiple colors and strong imagery.
- You can change the size of the image by entering in a new width or height in the Width/Height fields. You do not need to enter both as Photoshop will automatically resize the image based on the provided width or height. You can also enter a percentage into the Scale field to size a photo up or down.
- When you're done, you can hit Export All to save.
Resize an Image
You can also resize an image another way by going to the Image option in the top navigation menu and scrolling down to choose Image Size.
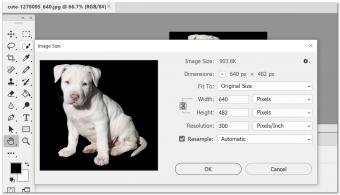
- The Image Size window will pop up.
- You can enter in either the width or height desired and the program will automatically size the other value.
- If you need to decrease the resolution of an image to further decrease the file size, enter that number into the Resolution box (typically 72 dpi for web use and 300 dpi for print quality).
- The default measurement uses is pixels. If you want to use another measurement, such as inches, just click on the arrows to the right of the measurement boxes and other options will appear and you can click on the one you want.
- Click OK when you are done and save your file.
Crop an Image
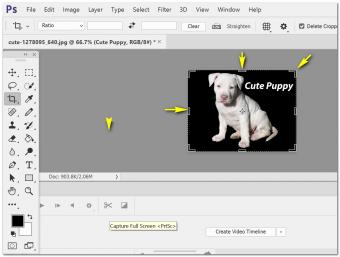
Cropping an image allows you to cut out parts of an image that you do not need. This only works as straight crops along the horizontal or vertical lines of the picture. If you want to take out specific parts of an image with different shapes, you will need to use one of the selection tools.
- To crop an image, click on the Crop tool in the Toolbar.
- A dotted line border will appear around your image with thicker solid lines as well.
- To crop the image, use your mouse to drag the solid lines (see yellow arrows) up to the point where you want to crop.
- When you have moved the lines to your desired crop points, you can simply press Enter to finish the crop, and then save your file.
Rotate an Image
Rotating an image allows you to move a photo around on its axis. Go to the Image option on the top menu:
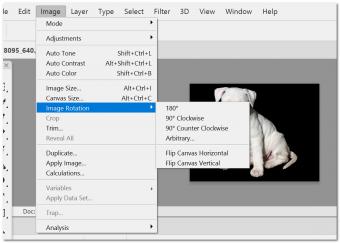
- Choose Image Rotation
- Choose the degree of rotation from the drop-down menu to the right. You can choose 180˚ or 90 ˚ in either direction, or choose "Arbitrary" for a custom amount.
- You can also flip an image vertically or horizontally by choosing the Flip Canvas option.
Working With Layers
The use of "layers" is critical for much of the magic you can make with Photoshop. If you imagine the art board on the screen in front of you as a three-dimensional workspace on a table, each layer in a Photoshop file would be placed on top of the photograph you are working on. When stacked together, they create one image. By using layers in Photoshop you are able to alter a photo in a myriad of ways without actually changing the original photo, which will be most likely the bottom "layer" of your image (although not always, as stacking order affects an image's final result).
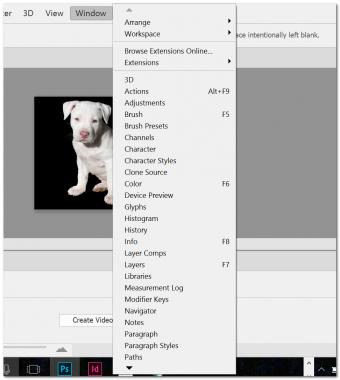
To use Layers, you can either go to the Layer option in the top navigation menu and use the drop-down menu (see above). Or, you can use the Windows option on the top Navigation menu and choose Layers in the drop-down menu which will give you a Layers panel on your workspace that you can move around with your mouse (see below).
Once you've clicked on the Layers option in the drop-down menu, the Layers panel will look like this:
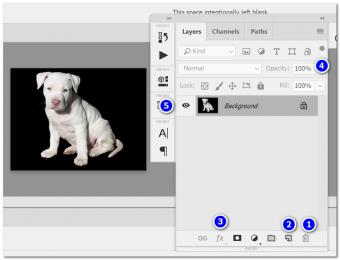
In the screenshot above:
- This is the trash can where you can drag layers down to in order to delete them.
- Clicking on this icon creates a new layer which will appear at the top of the current layer (in this image, that would be the "Background" layer.)
- This icon allows you to add different types of artistic effects to your layer, such as drop shadows, bevel and emboss, and gradient and pattern overlays.
- To control the opacity of a layer, you can type in a percentage, or click on the arrow on the right and a slider will pop up and you can drag the arrow along it to find the percentage that works best for you.
Adding Text to an Image
Adding text to an image is a good example of how layers work. To add text, go to your Toolbar and click on the "T" icon (purple arrow in the image below).
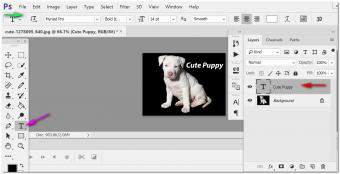
- A new layer will appear in the Layers Panel with the "T" icon.
- As you begin typing your text, you will see that text appear on the layer in the panel. If you type more than what can fit in that visual box, the rest will be cut off but you will see the beginning text. (red arrow in image above).
- To modify the text with different fonts, colors, sizes, or weights, use the text menu that will automatically appear along the top area under the navigation menu (green arrow in the image above).
- If you want to move the text around, use the Move tool on the Toolbar and drag the text around the image until you are satisfied with the placement.
- Remember to save your work!
Applying Filters to an Image
A really fun way to play with Photoshop is seeing what the many pre-programmed photo filters can do. Go to the Filter option in the top navigation menu.
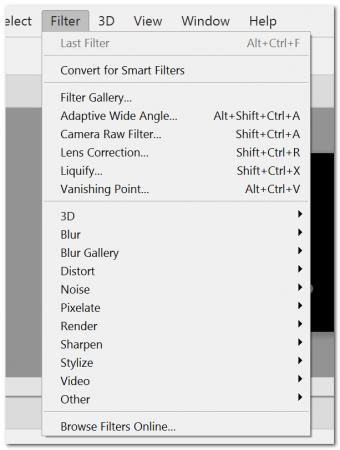
- A drop-down menu will appear and you will see a list of all the filters. You'll notice there are quite a few of them!
- The Filter Gallery option, which is the third item down on the drop-down menu, is where you can see all the different artistic effects. This will cause a screen to pop up with a preview of your image and you can click on all the filters on a side screen to see what they will do to your picture.
- Some artistic effects you can play with include:
- "Colored Pencil" which will make your image appear as if it was drawn with colored pencils;
- "Watercolor" which will give the photo a watercolor paint appearance;
- "Mosaic Tiles" which will make your image look as if it's a handmade mosaic;
- "Stained Glass" will turn your photo into a lovely stained glass version.
- In addition to all the filters that come pre-loaded, you can search online for "Adobe Add-on Photo Filters" and find many more paid and free filters that you can load into Photoshop for even more effects options. The first place to start looking is on Adobe's Add Ons page.
Where to Learn More About Adobe Photoshop
As you can probably tell by now, Photoshop is a fairly massive program when you look at all the many things it can do in terms of image editing. The best way to learn is through lots of projects and practice. There are some excellent free and fee-based resources on the internet for you to look into:
Adobe
Adobe has a very good support forum, as well as tutorials and in-depth videos on Adobe TV. Adobe also has an excellent YouTube channel with Photoshop tutorials.
Adobe Know How
Adobe Know How is a site dedicated to courses on all things Adobe. Some of the courses require a fee ranging from $99 to $699, but many of its courses for beginners are completely free. A good one to start with is the Adobe Photoshop CC: Your Complete Beginner's Guide course.
Lynda.Com
Lynda.Com has thousands of tutorials on all types of software and it's known for being a premier source of learning for designers for years. You can find some free courses but the majority require a subscription. The Basic plan starts at $19.99/month and the Premium plan starts at $29.99 per month. You can access a 10 day free trial before deciding to sign up.
CreativeLive
CreativeLive has over 1500 live and on-demand online classes, articles, and tutorials by experts on all things design. Prices range for $39 to $199.
YouTube
YouTube is also an excellent place to find free tutorials. Some of the best channels for learning about Photoshop include:
- Howard Pinksy/Ice Flow Studios has tutorials on not only the latest version of Photoshop but older versions as well.
- PhLearn has almost one million subscribers and the breadth and depth of tutorials on this channel are the reason why.
- TastyTuts is loaded with graphic design and digital art tutorials including a 45-episode course taking you through the fundamentals of the graphic design process.
- Photoshop Training Channel has videos on all different types of tools and special effects for photo manipulation in Photoshop.
About Adobe Photoshop
Adobe Photoshop is part of Adobe's creative suite of design software, which is the predominant software used by artists, graphic designers, photographers, website designers, and other professionals. Photoshop is available online via a subscription to Adobe's Creative Cloud for $19.99/month, which also includes 20GB of storage. Alternatively, you can get it bundled with a collection of more than 20 top design software options from Adobe including Illustrator, InDesign, Premiere, and more for $49.99/month. Another option is their Photography bundle for $9.99/month, which includes Photoshop, Lightroom, and Bridge plus 8 other mobile apps, 2GB storage, and a free portfolio website. If you're a full-time student or teacher, Adobe also has discount plans for you. Finally, if you're not sure if you're ready to make the financial commitment, Adobe offers free 30-day trials on most of their products, including Photoshop, so you can test it out for a month before setting up your subscription.
You don't need to be online to use the software, but it is available as a download only, and you will need to be online and signed in to Creative Cloud to install updates about once a month.
Getting Started With Adobe Photoshop
Once you have the program downloaded and ready to use, the best way to learn is to find the tutorials you feel most comfortable with and start practicing with images. Don't be afraid to ask questions on the Adobe support forums if you need help!


